Campfire Cooking Methods Compared — Direct Flame, Fire Grill, and Dutch Oven
Campfire Cooking Methods Compared — Direct Flame, Fire Grill, and Dutch Oven
If you're new to campfire cooking, your first win is easiest to build over a fire grill on a glowing ember bed. The heat stays steady, you control intensity by distance, and mushrooms, meat, and bread can all move along at the same time without drama.
New to campfire cooking? The single easiest way to nail your first session is on a fire grill over a glowing ember bed. The heat is predictable, you dial it in simply by moving food closer or farther away, and you can run mushrooms, meat, and bread side by side without things getting out of control.
That said, when you want to slow-cook a roast or let a braise tick away on its own, the Dutch oven is your best companion. And Direct flame cooking unlocks a whole different kind of satisfaction — once you learn to read your fire and position food at the right distance. This guide compares all three methods — direct flame, fire grill, and Dutch oven — across heat control, food compatibility, safety, and cleanup, while laying out a practical three-axis temperature system built around ember quality, cooking distance, and top/bottom heat. Everything here is reproducible on the day.
During a riverside autumn camp session, I set up three temperature zones on a single grill — mushrooms at one end, meat in the middle, bread warming at the far edge — and it hit me: campfire cooking rewards planning more than intuition. If you're still unsure what to cook how, this guide takes you through three courses designed to keep early failures rare.
Embers, Not Flames — The Campfire Cooking Foundation
What Is an Ember Bed? How to Build One and Know When It's Ready
The most useful heat source in campfire cooking isn't a roaring flame — it's a glowing ember bed. This is what you get after the wood surface carbonizes and the active flames die down: a layer of deep-red radiant heat. It looks quiet, but it holds serious energy. Because the heat transfer is steady, you can manage searing and gentle cooking with equal ease — a thick steak can develop a proper crust while root vegetables just below it are getting the slow treatment they need.
Active flames are the opposite story. Patches of food suddenly hit intense direct heat, dripping fat ignites into flare-ups, the outside chars before the center warms through, and uneven browning follows grease splatters across the grill. Most people who find campfire cooking "difficult" aren't fighting too much heat so much as they're cooking in unpredictable, moving flame when they should be waiting for it to settle.
Building an ember bed is straightforward. Start with thin kindling to establish the fire, add progressively thicker logs once things are going, and let the wood burn down fully. My personal rule of thumb is to drop the last logs and wait roughly 20 minutes until the bed has settled to a deep red glow before anything goes on the grill. (The exact timing shifts with conditions — use the color of the embers, how much ash has formed, and the distance from your food to judge.) Making this shift alone — treating the first half of the fire as the "build" phase and holding off cooking until the embers are ready — visibly cuts the "charred outside, raw inside" failure.
Wood Selection: Why Hardwood Wins for Cooking
The go-to firewood for campfire cooking is hardwood — oak and holm oak are classic examples. It takes a bit longer to catch, but once burning it holds a consistent heat and leaves a long-lasting ember bed. From a cooking standpoint, that "sustained deep-red heat" is everything. Food can sit, turn, and rest without the temperature swinging under it. Thick-cut meat, sweet potatoes, mushrooms, and reheated bread all pair naturally with the slow, even output of hardwood.
Softwoods like cedar and pine are excellent fire starters — they catch easily and build heat fast. The problem is their resin content keeps producing active flames, which makes them unreliable as a primary cooking heat source. That said, they're not something to avoid entirely. A useful flow: start the fire with thin softwood pieces to get things going, then shift to hardwood to build the ember bed you'll actually cook over. You get easy ignition without sacrificing cooking stability.
My own approach on cooking-focused fires is to mentally separate the wood into two categories: "what gets the fire started" and "what stays for cooking." Softwood plays its role in the first act; hardwood takes over as the embers deepen. That switch turns a campfire from a mood piece into a working heat source.
Three Techniques for Heat Control Using Distance
When people think about adjusting campfire heat, the instinct is usually to add or remove wood. But the more precise and reliable method while cooking is position rather than quantity. Moving food relative to the fire is faster and more responsive than trying to change the fire itself. On a fire grill with adjustable cooking heights — via grates, a tripod, or grill legs — anyone can apply this even on their first try.
Three ways to work with distance:
- Raise and lower the grill height
The most fundamental adjustment: distance between the ember bed and whatever you're cooking. Closer means faster browning; further means slower, more even heat penetration. Sausages and thin-sliced meat can go fairly close; bone-in chicken and thick vegetables benefit from pulling back a little. The same principle applies to a pot suspended from a tripod — just moving it up or down a notch stabilizes a boil.
- Use the temperature gradient across your fire grill
The entire fire bed is not one uniform heat source. Where embers are dense and glowing, you have high heat. Near the edges where the red has faded, it's gentle. Treat this like different burners. My standard riverside autumn layout: meat in the center over the hot zone, mushrooms toward the edge, bread warming at the far end. Sliding food from zone to zone gives you more fine-grained heat control than anything you can do with fuel management.
- Move the food first, adjust the fire second
The moment something looks like it's browning too aggressively, the fastest fix is distance — pull the food or the vessel away from the heat. Conversely, if the fire has died down, don't throw on a big log immediately. A sudden addition of wood sends up active flame and destabilizes everything. Reach first for a positional fix; bring embers together or add a small piece of wood only when repositioning isn't enough. Fewer flare-ups, more consistent results.
💡 Tip
Unsure where to place something on the fire grill? Designate the area directly over the heat as your "sear zone" and the area half a step back as your "cook-through zone." Setting that mental map before you start prevents the situation where you're standing there turning something that's scorching on one side while the center is still cold. One grill surface, two zones — meat and vegetables can run simultaneously without conflict.
Flames look impressive, but embers are what you cook on. Build the deep red heat, then move your food deliberately within it. Once that clicks, campfire cooking stops feeling like guesswork and starts feeling like something you can actually steer.
Direct Flame vs. Fire Grill vs. Dutch Oven — Know the Difference Before You Start
Quick Reference: Best Foods, Heat Control, Safety, Cleanup
Campfire cooking gets easier when you choose your method based on what you want to eat, not on which technique seems more advanced. Cooking the same cut of meat all three ways makes the differences concrete: the fire grill produces even browning; the Dutch oven retains moisture; Direct flame cooking adds a distinct char and aroma that the other two can't match, but reading the heat requires more active attention. Getting this overview clear up front makes your day-of planning far smoother.
| Direct Flame | Fire Grill | Dutch Oven | |
|---|---|---|---|
| Best for | Skewers, whole-roasting, searing, foil packets | Grilled meat, vegetables, seafood, mushrooms, warming bread | Braises, steam-roasting, whole roasts, bread, pizza |
| Best ingredients | Sausage, bacon, bone-in meat, whole vegetables | Thin-cut meat, chicken thighs, fish fillets, mushrooms, bell peppers, corn | Whole chicken, block cuts, root vegetables, beans, bread dough, potatoes |
| Heat control | Harder. Manage via distance, orientation, and hold height | Relatively easy. Adjust via grill height and zone placement | Doable with practice. Top/bottom heat ratio is the key lever |
| Equipment needed | Skewers, tongs, heat-resistant gloves, stable fire bed or grate | Fire grill, cooking grate, tongs, heat-resistant gloves | Dutch oven, bottom rack, lid lifter, heat-resistant gloves, stand |
| Cleanup effort | Low–medium. Fat drips on the fire bed area | Low. Mainly scrubbing grill marks | High. Pot body, lid, and bottom rack all need attention |
| Safety | More risk due to close proximity to flame | Most manageable of the three | Heavy and extremely hot; exercise care when moving |
| Likely restrictions | Open-ground Direct flame cooking is commonly prohibited at campsites | May be restricted in strong wind or on unstable ground | Avoid placing unsecured on uneven surfaces without a stable stand |
| Beginner friendliness | Low–medium | High | Medium |
| Mood | Wild, aromatic, interactive | Consistent, multi-item, approachable | Showpiece, hands-off, impressive at the table |
Heat control across all three methods comes back to the same point made earlier — it's primarily about distance from the fire, not fuel volume. The fire grill earns its reputation as the best starting point because distance is visually easy to manage, and you can run meat, vegetables, and bread from a single heat source by distributing them across zones. The resource "Campfire Cooking: 38 Recipes with 7 Tools and 5 Key Techniques" also organizes gear choices by what you're cooking rather than skill level, which is a more useful mental model.
The Dutch oven works differently from the other two. Rather than applying direct heat to food, it traps and circulates heat around ingredients. That's what makes it the right tool for braises and roasts, and why placing hot coals or embers on the lid to create top heat is such a key technique. For roasting, a rough starting ratio of bottom heat at 40% and top heat at 60% lets you develop the surface color and interior doneness together, which is exactly where Dutch oven cooking produces its most impressive results. Cast-iron versions require some ongoing maintenance — avoiding thermal shock, being careful with detergent — and enameled pots are a different category altogether. Taking a home enamel pot onto an open campfire is genuinely dangerous; keep it strictly separate from bare cast-iron Dutch ovens designed for outdoor use.
焚き火料理38レシピ掲載!7つの調理道具と5つのコツなど網羅的に解説 | ソトレシピ|キャンプ飯からご当地グルメまで「おでかけ×食」に特化したメディア
sotorecipe.comTerminology Check: "Direct Flame" Means Two Different Things
One genuinely confusing area in campfire cooking discussions is that "Direct flame cooking" carries two distinct meanings — and mixing them up can turn a cooking conversation into one about campsite violations.
The first meaning is lighting a fire directly on the ground. This is what campsites mean when they say "no Direct flame cooking" — a rule that prohibits open fires without a raised fire grill. Most sites enforce this to protect turf and soil, and because ash and ember disposal from ground-level fires is difficult. Using a fire grill is the standard-compliant approach. "16 Easy and Delicious Campfire Recipes" also takes a fire-grill-on-equipment setup as its baseline assumption.
The second meaning is a cooking style in which food or cookware is held close to the flame or embers. Searing meat on a skewer, positioning a pot low over the fire, tucking a foil packet right against the embers — these are all described as "Direct flame cooking" in recipe contexts. They have nothing to do with whether you're allowed to burn on the ground.
⚠️ Warning
In this article, "Direct flame cooking" refers to the close-proximity cooking style, not to building a fire on bare ground. When a campsite says "Direct flame cooking prohibited" or "Direct flame cooking allowed," they are describing whether open-ground fires are permitted — a completely separate question. Reading these apart prevents confusion.
Keeping these two definitions separate leads to a clean practical conclusion: even at a campsite that prohibits ground-level fires, you can still do skewers and searing on a fire grill. What's prohibited is burning on the earth, not the act of cooking food close to heat. The more visually dramatic the dish, the more likely this confusion comes up — so getting the language straight actually simplifies gear selection.

簡単&おいしい「焚き火料理」16選!おすすめ道具や失敗しない火起こしのコツも♪ |じゃらんニュース
キャンプで挑戦したい焚き火料理。ホイル焼きなど焚き火台に入れるだけの簡単調理から、スキレットやダッチオーブンを使った本格料理まで、焚き火料理の達人がおすすめする16レシピを大公開!ワイルドな肉料理や季節の野菜など素材を生かした美味しい料理ば
www.jalan.netWhich Is Right for You? A 3-Step Decision Flow
Choosing a cooking method is easier when you start from what you want to prioritize that day rather than from the recipe. Campfire cooking satisfaction comes from the combination of taste, safety, setup effort, and ease of cleanup — not any one of those alone.
- Safety first
Fire grill is your match here. Height is easy to maintain over a fire grill, and adjusting distance to control heat is intuitive — even if you overcook slightly, you have time to correct it. Running meat, vegetables, and seafood simultaneously across different zones is natural with this method, and the results are consistent. As a first campfire cooking experience, the fire grill gives you the most reliable path to feeling like you actually know what you're doing.
- Efficient setup and cleanup
Still the fire grill, but with an even simpler menu. Pre-cut vegetables, marinated meat, mushrooms, and firm tofu cooked in sequence are all you need for a genuinely satisfying meal. The Dutch oven can feel hands-off in concept, but the weight and post-meal cleaning add up. On a day when you want to move fast and pack out cleanly, the fire grill is the lower-friction choice.
- Maximum wildness and experience
Direct flame cooking is where that lives. Working skewers and sear-roasted cuts over an open fire — reading the heat with your hands, chasing the moment when bacon or bone-in meat hits perfect temperature — delivers a version of campfire cooking the other two can't replicate. The aroma is sharper and more immediate. That said, the heat hits fast and unevenly, and charring and undercooking can both happen at once. What looks bold actually requires careful technique — keep things at low-and-slow distance rather than dropping food over intense flame.
Beyond these three, anyone prioritizing a showpiece meal will find the Dutch oven worth the extra weight. A whole bird, block-cut meat, or root vegetables sealed inside while the lid holds a layer of embers is a genuinely impressive result. In my own tests, meat cooked in a Dutch oven consistently held more moisture — the difference when you cut into it is noticeable.
If you can only pick one answer: start with the fire grill. Move to the Dutch oven when you want to cook rather than just grill. Go Direct flame when the experience itself is the point. Framing it this way turns the choice from "I'm not sure what to do" into a deliberate decision that you'll actually enjoy.
Direct Flame Cooking Recipes
Direct flame cooking success depends heavily on what you put on the fire. The methods that work well here share a trait: they can tolerate some flame variation without failing. Sausage, whole-roasted cuts, bone-in meat, foil packets — these are all in their element. The ingredients that thrive with Direct flame cooking are ones where charring the exterior is part of the point, and extended cooking time doesn't hurt: whole bacon slabs, duck breast, sausage, onions. Thin-cut meat and small diced vegetables, on the other hand, tend to char and dry out before cooking through — these belong on the fire grill where you can manage the heat more precisely.
Heat control with Direct flame cooking is objectively harder than with a fire grill or Dutch oven. But it's more accurate to say the control technique is different than that control is impossible. What matters most isn't the intensity of the flame but how far the food sits from the heat, which angle the heat arrives from, and when you pull things back to rest. Even on a riverside campsite using a tripod over an open ground fire, simply moving things up a notch and shifting to a low-and-slow position was enough to stop charring and reduce grease flare-ups significantly. Beginners especially should default to low and slow over intense proximity — the results stabilize quickly once you commit to that approach.
Equipment requirements are minimal: skewers, tongs, heat-resistant gloves, and either a fire grill with grates or a tripod if you're working over an open setup. Cleanup is lighter than with a Dutch oven, though fat-dripping recipes will leave the surrounding fire bed area needing attention. The safety calculus is real — you're working close to the heat, and burns and sparks are genuine risks. Ground-level fires are prohibited at most campsites in Japan, so this section assumes either a site that specifically permits it, or a fire grill plus grates or tripod setup that gives you Direct flame cooking results without opening ground fires.
Recipe 1: Whole Bacon Slab Sear
If you want to understand what Direct flame cooking is actually about, a whole bacon slab is the clearest demonstration. Fat melts slowly into the surface, building aroma progressively, and time on the fire deepens flavor rather than destroying it. Sliced bacon would burn out from the heat; a whole slab works with low-and-slow distance, giving beginners real margin before overcooking becomes irreversible.
Expect roughly 1.5 to 2 hours — this is the timing range cited by CAMP HACK as well. Don't think of this as a quick cook. It's a slow aroma-building process, and that framing keeps you from rushing it in ways that cause failures. Positioning: not directly over active flame, but close enough to the embers that fat starts to slowly seep through the surface. On a tripod, start high and only drop down if color isn't developing after a while — that's the most forgiving approach.
Flip timing: wait until the surface on one side has dried out and developed a sheen, with fat starting to run in one direction. Frequent flipping works against you here; letting each side develop properly before turning is what builds crust and aroma. My rotation is all four sides in sequence, moving to the next face when the fat at the corner starts to go translucent.
Two things that prevent failures: keep it away from active flame, and increase distance the moment fat starts dripping in volume. Bacon is delicious, but dropped fat ignites readily, and cooking through flare-ups pushes the crust past "charred" into bitter. If the flame rises, don't fight it — lift the slab higher and let things calm down before dropping back into position. Rest it before cutting; the fat and juices redistribute noticeably in just a few minutes.
Recipe 2: Duck Breast, Direct Flame Style
Duck breast is well-suited to Direct flame cooking. The fat cap is where its character lives, and the gradual rendering that happens over careful distance work creates an aroma you won't replicate on a standard grill. You can absolutely cook duck on a fire grill and have it turn out well — but searing the skin side with some proximity to the embers gives it a wildness that's hard to describe without eating it. That said, duck requires more precise heat management than bacon. Beginners: resist the temptation to apply high heat — work the skin side slowly at a distance.
The time guide from Jalan News: 5 to 8 minutes skin-side down, 3 to 4 minutes on the flesh side. But more important than the clock is watching for fat to start seeping from the skin and the surface beginning to firm slightly. For positioning: close enough that smoke rises from the skin, but not so close that the skin scorches before the fat has started rendering. Too close and you char the skin before the interior warms through; too far and excess fat never renders and the result is heavy.
Flip when the edges of the skin are golden and color has climbed roughly halfway up the sides of the breast. Flip too early and you lose the crust; flip too late and the fat over-renders, drying the meat out. The flesh side cooks quickly, so pull it before it's fully cooked on that side — residual heat finishes the job. A common mistake with Direct flame cooking is assuming aggressive surface heat means the center cooks faster. With duck it's the opposite — patient work on the skin side produces a more balanced final result across the whole breast.
The most useful failure-prevention habit: watch where the fat falls and reposition before the fire responds. When fat drips and a flare-up starts building, shift sideways or raise the height immediately rather than letting it continue. On a tripod, starting slightly close and moving up a notch as fat begins rendering is a reliable rhythm. Staying in control of the distance means Direct flame duck is far less stressful than it sounds.
Recipe 3: Whole Onion Foil Packet
The most forgiving Direct flame cooking recipe is the foil packet, and the clearest example is a whole onion. The outer skin and the foil absorb and moderate the heat together, which buffers against the kind of flame variation that causes problems with exposed food. If you want the experience of cooking over fire but aren't ready to manage searing directly, this is the recipe to reach for. It also runs quietly in the background while you're managing something more active — a built-in second dish.
Wrap a whole unpeeled onion in foil and place it near the embers, or toward the cooler edge of the fire grill. The goal isn't to hit the onion with flame directly — it's to let it absorb radiant heat slowly from nearby embers. You don't need the center of the fire for this; the stable warmth at the perimeter is actually better for drawing out sweetness.
Flip halfway through when the bottom of the packet has taken on solid heat and the onion has started to soften slightly. One rotation is usually enough to even out the heat. You can't see much change through the foil, but if you pick it up with tongs and it feels noticeably softer and heavier than when you started, the cooking is progressing well.
Two things that make a real difference: double-wrapping the foil and not parking it directly over the hottest part of the fire. Single-layer foil lets the bottom scorch and allows ash to work through. Onions are high-moisture, which means they handle extended gentle cooking well and are very forgiving of extra time. Among Direct flame cooking recipes, cleanup is minimal and grease splatter is essentially nonexistent — this one combines safety and simplicity in a way few campfire dishes do.
Direct Flame: 3 Strengths / 3 Risks — Aroma and Wildness / Burns, Sparks, Rule Compliance
Direct flame cooking's first and most obvious strength is the aroma. The moment fat or moisture hits heat at close range produces a smell that's distinct from anything a fire grill or Dutch oven creates. With ingredients like bacon and duck breast where fragrance is part of what makes the dish, this difference is immediately apparent. Second: the interactive, hands-on quality of working skewers and sear-roasted pieces close to an open fire is genuinely enjoyable in a way no other method replicates. Third: equipment requirements are light, which means cleanup is lighter too. Compared to a Dutch oven session, teardown is substantially faster.
The risks are equally clear. First: burns. Flipping, rehandling skewers, adjusting height — all of this happens close to a heat source, and sustained close proximity means sustained exposure. Second: grease flare-ups and sparks. Fat-rich ingredients produce active flame, and that flame can reach nearby clothing and gear quickly. Third: campsite rule compliance. Ground-level open fires are prohibited at the majority of campsites in Japan, so outside of sites that explicitly permit it — typically certain riverside locations — Direct flame cooking must be done on a fire grill with a proper elevated setup.
💡 Tip
When Direct flame cooking feels uncertain, narrow your first dish to one of two options: "sear-roast a whole cut slowly at distance" or "seal something whole in foil." Neither requires the heat control precision of exposed thin cuts. You won't match a fire grill for precision, but picking Direct-flame-friendly ingredients does most of the work.
Looking at the full picture — food compatibility, ingredients, equipment, safety, cleanup — Direct flame cooking isn't a catch-all. It's a method that becomes more powerful the more specifically you use it. The aroma and experience payoff is high, but the control system is built entirely on distance. More demanding than a fire grill, lighter and more immediate than a Dutch oven. Once you understand that character, deciding which dishes to give to Direct flame cooking becomes much more intuitive.
Fire Grill Recipes That Minimize Failures
Building 3 Heat Zones and Using Grill Height
The key to reliable fire grill cooking is refusing to treat the entire heat source as one uniform zone. Once your ember bed has settled, build strong, medium, and low heat zones across the fire bed. Thick-cut meat and anything that needs a proper sear goes over the hot zone; vegetables that cook through quickly sit in the middle; mushrooms and seafood that need finishing time or are prone to drying go to the gentle end. This setup lets you run multiple ingredients simultaneously without firefighting, and it keeps each item at its best temperature. The Soto Recipe resource on campfire cooking tools also highlights zone placement as a key factor in results — the grill position matters as much as the grill technique.
A useful refinement: tilt the grill grate slightly so one side sits closer to the embers than the other. This gives you a near and far side even within a single heat zone. The practical result: you can have a "browning spot" and a "resting spot" operating simultaneously over the same fire, which makes it significantly easier to manage small-cut ingredients for kids without letting anything burn.
Movement is better than patience while grilling. Rotate, reposition, flip — doing these actively reduces scorched patches far more reliably than simply watching and waiting. Skin-on ingredients especially benefit from a quick dry-down period at the start: let the skin face the heat briefly to release surface moisture, then move to the gentler zone once fat and steam start appearing. Fire grill cooking isn't about locking in a temperature and holding it — it's about continuously adjusting position as the food changes.
ℹ️ Note
Before anything goes on the grill, decide where your "sear zone," "cook-through zone," and "holding zone" are. Treating the grill as a seating arrangement — knowing before you start where each item belongs — keeps the whole session from turning chaotic. Set the layout, then load the food.
Recipe 1: Beef Steak — Low-and-Slow Grill
A moderately thick beef steak is one of the best first fire grill recipes. The reason: you can build surface color while managing internal doneness entirely through distance, without having to hold anything by hand like with Direct flame cooking, and without the setup weight of a Dutch oven. Sear in the hot zone, then shift to medium to carry through — the two-stage process is easy to understand and makes a solid practice run for fire grill fundamentals.
Start in the hot zone and get a solid crust on one side. Don't hold position — rotate the steak slightly against the grill marks and shift half a step every so often to prevent any single area from going black. Once one side is well-colored, flip, repeat on the other side, then move to the medium zone to carry the heat through to the center. Build color in one place, develop doneness in another — that separation is what reduces mistakes.
Fatty cuts are prone to flare-ups from dripping fat. Rather than holding position, slide the steak to a cooler spot the moment the fire responds to the drips. The fire grill is ideal for this — you can hear the sizzle and react instantly with a small position change. Rotating the steak slightly with each flip alone is usually enough to prevent the "raw center, charred edges" failure.
The goal: a steak where the juices don't pour out when cut, surface crust is present, and the center is still moist. Salt alone is genuinely enough; a small knob of butter on the finished surface works very well with the campfire smoke character that's already in the meat. Counterintuitively, the more you resist the hot zone and work with distance, the more refined the result — that's what makes steak a satisfying fire grill benchmark.
Recipe 2: Mixed Mushroom Packet
Mushrooms cook beautifully directly on the grill, but as a beginner's dish, wrapping them in a packet gives you better control of the result. Mixing shimeji, shiitake, and king oyster mushrooms gets you contrast in texture, and different moisture levels means a single packet can be interesting from start to finish. Mushrooms that lose too much moisture drop quickly in quality — keeping them in the medium-to-low zone for a gentle steam cook is the move that prevents that.
Method: tear or cut the mushrooms into eating pieces, toss lightly with oil and salt, and wrap loosely in foil or a heat-safe sheet. Place in the medium zone and turn periodically to circulate the steam through the packet. If only the bottom face is getting heat, moisture pools on one side — repositioning, not just flipping is what keeps things even. Even a small shift within the same "medium" area changes how steam rises through the packet.
For added char at the end, open the packet just slightly during the last minute and let the tops take a little direct heat — medium zone is fine for this, no need to push into the hot zone. Shiitake that still holds a little moisture at the moment of finishing stays full and juicy in the mouth rather than shrunken. Works as a side dish with anything, and holds up as a main course in its own right.
Recipe 3: Whole Shell-On Grilled Prawns
For seafood on the fire grill, shell-on prawns are the most accessible starting point. They hold together better than fish fillets and are easier to read than clams — you can tell where the cooking is by looking at the shell color and body firmness. The shell keeps the flesh moist, so as long as you avoid overcooking, the sweetness survives intact. Start in the medium zone and shift briefly toward the hot zone only when you want to build color.
Start by letting the shell surface dry slightly over the heat — this helps develop aroma. If heat only hits one face continuously, the prawn will curl and lose even contact with the grill. Turn them over, and also swap head and tail positions when things feel uneven. That combination — flipping plus reorienting front to back — prevents the head burning while the body stays cool, or the tail drying out while the center stays underdone.
Once the shell has taken on full color and the flesh firms up, you're close to done. Prawns don't produce dripping fat the way meat does, so flare-ups are minimal, but they go rubbery fast when overcooked — don't let them sit. A squeeze of lemon is all you need; rubbing lightly with garlic oil before cooking makes the shell aroma noticeably sharper. Seafood feels harder than it is. Letting the shell do the work is the mindset shift that makes success much more consistent.
Fire Grill: 3 Strengths / 3 Risks — Easy Access / Dropping, Drying Out, Scorching
Fire grill cooking's primary strength is accessibility — you don't have to hold anything by hand at a fixed distance the way Direct flame cooking requires. Set items on the grill, move them around, pull things back when needed — running multiple ingredients at once is genuinely easy. Second: food flexibility across meat, vegetables, mushrooms, and seafood. Stack the hot/medium/low zone system with grill height and a single fire grill becomes capable of several different cooking environments at once. Third: consistency. The low-and-slow approach referenced in "The Secrets of Fail-Proof Campfire Cooking" is easiest to execute on a fire grill — it's the method that best converts patient distance management into reliable results.
Watch for three failure modes. First: food falling through the grate. Small-cut vegetables, crumbled mushrooms, and curled-up prawns are all prone to slipping through when you flip. Size uniformity, packet wrapping, or skewering solves this. Second: drying out. Mushrooms, seafood, and thin-cut meat placed in the hot zone too long will shed their moisture fast. Shorter time in the heat, with active use of the resting zone, preserves texture. Third: scorching. When something turns black before browning properly, the cause usually isn't excessive heat overall — it's sitting in one spot too long.
The fire grill principle: move the food rather than adjusting the fire. Rotate, reposition, flip. These three habits become automatic quickly, and once they do, the difficulty of campfire cooking drops substantially. The reason the fire grill is the easiest place to build your first successful campfire meal is exactly this operational simplicity.
![【憧れのワイルド飯】教えて!みんなの失敗しない焚き火料理の極意&おすすめギア | CAMP HACK[キャンプハック]](https://images.camphack.jp/wp-content/uploads/2020/12/1ccac4627ad827009f57a910fec0ffa5-2.jpg)
【憧れのワイルド飯】教えて!みんなの失敗しない焚き火料理の極意&おすすめギア | CAMP HACK[キャンプハック]
ワイルドかつプリミティブな魅力の詰まった焚き火料理。憧れるけど、火加減やコツが分からなくて不安……。今回は、そんな人に捧ぐ「焚き火料理の極意&実例集」をお届け!ベテランキャンパー直接聞いたコツからおすすめギアまで一挙ご紹介しちゃいます!
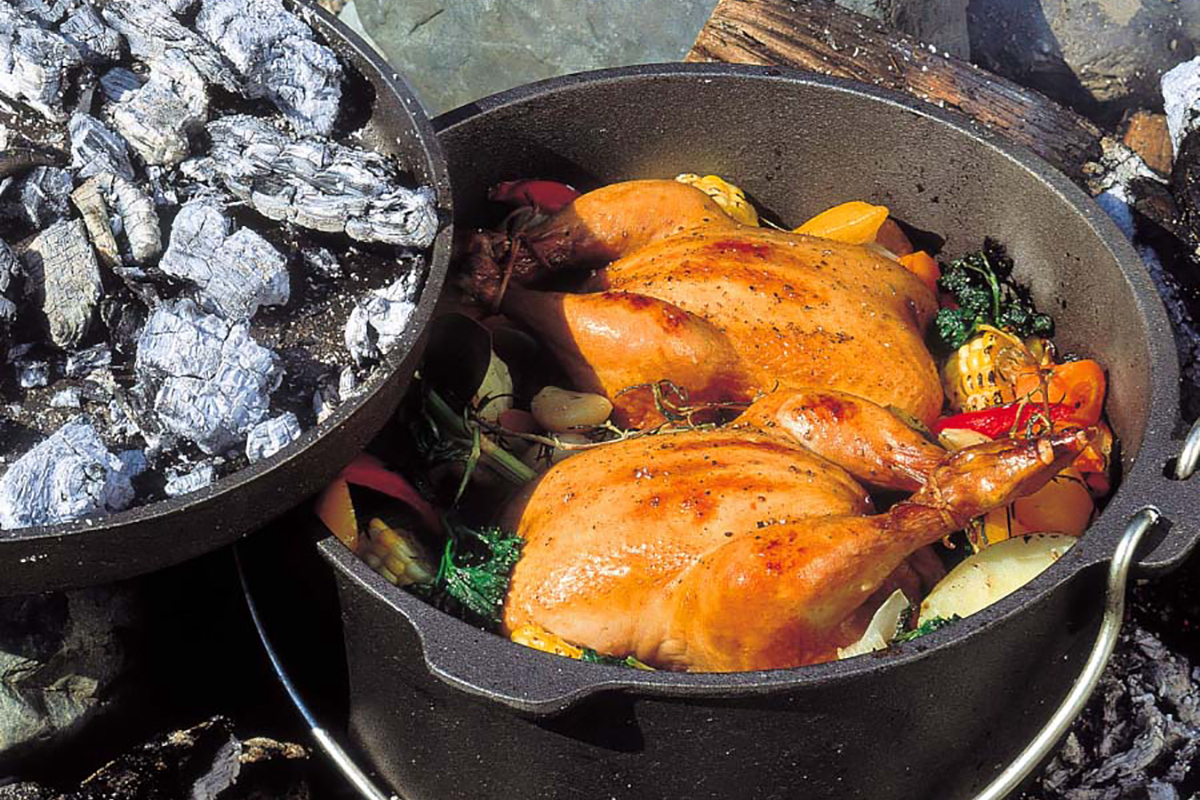
camphack.nap-camp.comDutch Oven Recipes — Let the Pot Do the Work
Bottom Rack and Top/Bottom Heat — The "60% Top, 40% Bottom" Rule
What makes the Dutch oven so effective for hands-off cooking is its ability to combine heat retention, sealed moisture, and dual-direction heating in a single vessel. The thick cast-iron walls absorb and hold heat; embers placed on the lid become top heat; the fire below becomes bottom heat. Rather than applying flame directly to food like Direct flame cooking or a fire grill, you're building a small oven inside the pot. That's why it handles braises, roasts, bread, and pizza — all of which benefit from encircling heat rather than direct exposure.
For roasting, the ratio to keep in mind — also cited in HYAKKEI — is bottom 40%, top 60%. When you want both surface development and interior doneness (as with meat or bread), leading with bottom heat causes the base to set before the top has any color. Heavier top heat balances browning and cook-through more naturally. In my own experience at a winter camp making a dark beer braise, boosting the lid embers when wind was dropping the temperature kept the pot's internal environment steady in a way adjusting the fire below could not.
The bottom rack is what makes this possible to rely on. It lifts ingredients away from direct contact with the pot base, softening the heat that reaches the bottom surface of whatever you're cooking. For roast beef this prevents the contact side from hardening while the rest of the cut is still undercooked; for sweet potatoes it keeps one part of the skin from scorching through. An added benefit: the small air gap beneath ingredients allows heat and steam to circulate more freely, pulling the cooking style toward steam-roasting. Think of the Dutch oven's reliability not as a property of the pot alone — it's the pot plus the bottom rack working together.
💡 Tip
If browning is weak on a roast or bread, look at the top heat first before adding more to the bottom. Dutch ovens run hot from below, and the lid is usually the lever that produces the visible difference in crust quality.
Recipe 1: Roast Beef
Roast beef is where the Dutch oven's campfire reputation earns its keep — it's the dish that most clearly demonstrates what "slow, sealed, encircled heat" can produce. Captain Stag's official guide puts the cook time at approximately 1 hour, with the approach of searing the exterior first and then transferring to the pot for the long rest. The result: a caramelized crust with a genuinely moist center — and because the pot does most of the temperature management, you spend less mental energy monitoring than you would over an exposed heat source.
Method: season a beef block cut with salt and pepper, sear on all sides to set the crust, and transfer to the Dutch oven over the bottom rack. Add garlic and rosemary if you want the aromatics. Keeping the meat off the base of the pot is essential — with the bottom rack in place, the juices flow gently rather than pooling under the contact point where they'd otherwise over-concentrate the heat. Close the lid, load the top with embers, and let the interior do its work.
Getting that clean pink cross-section might look like a specialist result, but with the Dutch oven it's actually one of the more reproducible campfire dishes — precisely because you don't need to manage which face is getting heat at every moment. Rest the joint before slicing; the juices settle and the texture holds together much better. Campfire-infused roast beef needs nothing beyond salt, though wasabi soy sauce or whole-grain mustard both pair exceptionally well.
Recipe 2: Baked Sweet Potatoes
Baked sweet potatoes are the Dutch oven's most straightforward demonstration. Captain Stag puts it at about 30 minutes, and with minimal ingredients and steps, the payoff from the pot's heat retention and sealed environment is immediately legible. Set the pot over embers, load the lid, and the sweet potato is progressively surrounded by heat from all sides, drawing out its natural sugars evenly.
The name suggests the potato is in contact with stone or a hot base, but what actually matters inside the pot is keeping it lifted. The bottom rack prevents the potato from pressing directly against the hot base and burning on contact while the center remains underdone — a failure mode that's common without it. The heat wraps rather than concentrates. For best results, use potatoes of similar diameter so they cook through at roughly the same rate.
When you split a properly done sweet potato and steam pours out, that moment is itself worth the trip. Butter is excellent, but they're genuinely sweet enough without. Sweet potatoes lack the visual drama of a meat course, but eating them at a cold-weather campfire produces a satisfaction that few campfire dishes match. If you've just bought a Dutch oven and want to try it immediately, this is the recipe.
Recipe 3: Beef Shank in Dark Beer Braise
For pure Dutch oven expression, a beef shank braise in dark beer is difficult to beat. Captain Stag's reference timing is approximately 1.5 hours, and the ratio of time required to active hands-on effort is about as favorable as cooking gets. Load the pot, apply heat, and the cast iron's thickness and lid weight manage temperature and moisture while you do other things.
Sear the beef shank first, then combine with onion, carrot, and enough dark beer to cover. The pot's tight seal keeps aromatics from escaping and lets the braising liquid develop body naturally — situations where an ordinary pot would require adding liquid or adjusting for evaporation simply don't arise at the same rate. On cold winter camps, lifting the lid after ninety minutes and being hit by the combined steam of beer and beef before you can even see what's inside is one of those campfire cooking moments that justifies all the gear.
Windy conditions will cool the pot sides and cause the simmer to look weaker than it is. The response: add more embers to the lid, not the fire below. Top heat entering through the lid wraps the whole vessel and keeps the braise moving steadily even when the sides lose ground. Beef shank benefits from sustained gentle heat rather than hard boiling — low and slow produces the collagen-to-gelatin conversion that makes the meat fall apart properly. Serve with bread to make use of the braising liquid.
Recipe 4: Focaccia / Pizza
The Dutch oven handles bread and pizza naturally — top/bottom heat creates an actual baking environment on top of a fire grill. The hinata resource notes 20–30 minutes for working the dough and an overnight first rise, which means preparing the dough at home or the previous evening eliminates one of the most time-consuming steps at camp. At the fire, you're down to shaping and baking. Top heat from the lid is the critical variable here — insufficient top heat and the surface stays pale and underwhelming even when the base is done.
For focaccia, lay a sheet of parchment paper over the bottom rack before adding the dough. This prevents the base from overbaking and makes removal straightforward — even on a first attempt. The result tends toward crisp on the outside with a moist crumb inside; olive oil and salt are genuinely sufficient, though there's no reason to hold back on toppings. For pizza, a thin-stretched base cooks quickly, and you can read doneness from the melting of the cheese and the color of the edge crust.
Both focaccia and pizza share the same Dutch oven rule: relying only on bottom heat will finish the base long before the top is ready. Working the lid embers actively is where the results come from. When top heat is well-managed, baking times that would be lengthy at home can feel surprisingly short at the fire — the sensation of "that went much faster than I expected" comes up regularly. Watching dough puff and brown inside a sealed cast-iron pot remains one of the genuinely surprising things you can do over a campfire.
Dutch Oven: 3 Strengths / 3 Risks — Fail-Safe / Weight, Maintenance, Burn Risk
The Dutch oven's biggest strength is that the pot absorbs fire variability. Campfire heat is inherently unsteady, but cast iron's thermal mass acts as a buffer — braises and roasts come out more consistently than any surface-cooking method can produce. Second: a single vessel handles boiling, steaming, and baking. Moving from soup to bread to a meat course in one pot over one fire session is a real advantage in terms of both logistics and cleanup. Third: sealed cooking means fewer interruptions. Unlike a fire grill that rewards constant attention, a lidded Dutch oven can be largely left alone between checks.
The weaknesses are straightforward. First: weight. Carrying it, repositioning it, lifting the lid — nothing about a cast-iron Dutch oven is light. That said, the weight is what creates the heat retention that makes it work. The trade-off is honest. Second: maintenance. Not just the pot body — the lid interior, the bottom rack, all of it needs washing and drying. After a braise especially, fat and moisture work into everything. Whether you find that care satisfying or burdensome determines whether a Dutch oven is your kind of gear.
The third risk is burns, and it's easy to underestimate. The lid, handle, and outer walls all reach extreme temperatures, and none of this is obvious from looking. Lid lifter and heat-resistant gloves are non-negotiable, but beyond the equipment: the Dutch oven requires a different kind of alertness than a fire grill. Moving a hot lid even slightly can cause embers to shift and fall; brushing the rim while adjusting position is easy to do. The care required is a different category from fire grill work — not more dangerous overall, but different enough that first-timers should be deliberate about it.
Seasoning, and the Enamel Pot Problem
Not all Dutch ovens work the same way. Bare cast iron and enamel-coated cast iron require completely different handling approaches. For bare cast iron, some products require full seasoning before first use; others come from the factory with sufficient conditioning to simplify the initial process. Captain Stag's official maintenance guide outlines the fundamentals: dry thoroughly after use, apply a thin oil coat, and never shock the metal with rapid temperature change. The Dutch oven is a tool where how carefully you clean and store it after cooking determines how well it performs next time.
Bare cast iron builds character with use — the seasoning layer develops and deepens with repeated cooking, which improves both non-stick performance and the subtle flavors it imparts. The downside: residual moisture left in the pot can compromise the seasoning layer, and thermal shock from rapid cooling can damage both the metal and the surface coating you've built up. These are things to internalize before you rely on the pot.
Enamel Dutch ovens look beautiful and are easy to maintain day-to-day, but many of them are not designed for campfire or direct-flame use. Extended exposure to intense fire is a different category of stress from stovetop or oven use, and treating an enamel pot the same as a bare cast-iron Dutch oven can cause permanent damage. The convenience of using one pot from home kitchen to campfire is appealing, but if open-fire cooking is your actual use case, keep bare cast iron and enamel firmly in separate categories. Choosing a Dutch oven means deciding not just what you want to cook but where and how intensely you'll be heating it.
知っておこう!ダッチオーブンのメンテナンス | アウトドアお役立ち情報
ダッチオーブンはどんな料理でもこなす1台5役の万能鍋。キャンプなどのアウトドアシーンで大活躍。そのためにシーズニングという慣らしをしっかりと行い準備しましょう。ダッチオーブンもサビには弱いので大切な使用後のメンテナンスと保管もしっかり覚えよ
www.captainstag.netPractical Meal Plans for Beginners
90-Minute Timeline: Fire Grill + Dutch Oven
For family or group cooking, the most effective flow is running appetizers on the fire grill while the main course develops in the Dutch oven. The key is not letting the fire-building period go to waste. While the embers form, cut ingredients, assemble what's going in the Dutch oven, and prepare the fire grill plates — by the time the fire is ready, your setup should be too.
A menu that works reliably: mushrooms and bell peppers on the grill as starters, a Dutch oven roast or braise as the main, and warmed bread or foil-wrapped potatoes as the starch. Roast beef takes roughly an hour; baked sweet potatoes are about 30 minutes — start the main first in the Dutch oven, then open the fire grill for appetizers while the pot does its work.
From the first moment of fire-building, keep the three heat zones in mind: strong zone for the initial fire development and getting the Dutch oven up to temperature; medium zone for the fire grill main work with mushrooms, vegetables, and moderate cuts; low zone for warming bread and holding items that are done but not yet being served. The Dutch oven goes in at medium-to-high heat initially, then pulls back slightly once the temperature is established — the retained heat carries it from there.
Rough timeline:
- 0–15 min
Build the fire while prepping the main course. Combine meat and vegetables destined for the Dutch oven; cut appetizer mushrooms and vegetables. If you're serving bread, unpackage it and keep it covered so it doesn't dry out.
- 15–30 min
Once the ember bed has started forming, get the Dutch oven going first. For a braise, bring the pot up to heat. For a roast, sear the exterior briefly before closing the lid. Bottom-heavy heat causes the base to set before the lid side catches up — follow the 40% bottom / 60% top distribution and put the embers to work on the lid early.
- 30–50 min
With the Dutch oven running, shift focus to the fire grill appetizers. Mushrooms, bell peppers, sausage, and corn all have predictable cooking times in the medium zone. If color develops too fast, slide to the low zone; push toward the hot zone only for items that aren't taking heat. Getting appetizers to the table during this window converts main-course waiting time into dining time.
- 50–70 min
Work on the starch or sides. Foil-wrapped potatoes can be finishing in the low-to-medium zone; bread needs only a brief warm on the low zone. The Dutch oven main benefit from one position shift or slight relocation of the pot to prevent uneven heat distribution at this stage.
- 70–90 min
Finish the main. If it's a braise, crack the lid to reduce slightly. If it's a roast, check browning and doneness and rest before slicing. Keep the sides warming on the grill and sequence the serving order. By the time the appetizers are done, the main and starch should arrive together — the timing feels natural without effort.
More people makes this plan easier, not harder. One person manages the fire zones, one handles ingredient staging, one manages plating — those three roles are all you need and they don't get in each other's way. In family camping, keeping the fire area from getting crowded isn't just a safety benefit — it actually makes the cooking flow better. If you're thinking about layout, the same principles that inform family tent recommendations and selection guides (how to organize living space efficiently) carry over to how you arrange your cooking setup.
【2025年】ファミリーテントおすすめ33選!達人が2ルームテントを選ぶ理由とは?定番品も多数紹介! | キャンプ・アウトドア情報メディアhinata
ファミリーキャンプの達人・YouTuberのshiromaniさん監修のもと「失敗しないテントの選び方」「愛用アイテム」を紹介します。
hinata.me60-Minute Timeline: Fire Grill + Foil Packets
For solo or small-group cooking, fire grill as the main event with one foil packet dish in support is the most reproducible 60-minute plan. The showpiece appeal of the Dutch oven isn't there, but cleanup is far lighter and fire management is simpler. On days when I want to eat sooner and break down faster, this is the format I default to.
A balanced menu: bacon or mushrooms as a quick starter, grilled chicken thigh, firm tofu, or sausage as the main, and foil-wrapped potatoes or vegetables as the side. Full bacon-block searing takes 1.5 to 2 hours — in this plan, use thicker-cut bacon as a quick, savory starter instead of a slow-roast centerpiece, and you can fit everything comfortably into 60 minutes.
Zone logic is simpler here: hot zone for browning, medium zone for cooking through, low zone for parking foil packets. Start foil packets in low-to-medium right away, and concentrate the fire grill action just before serving. Getting foil packets started early means they occupy the low zone without taking up active grill space.
The flow:
- 0–15 min
Build the fire while assembling the foil packets. Potato, onion, mushrooms, butter — get the packets wrapped and ready to place once embers form. Season the meat and vegetables for the grill at the same time.
- 15–25 min
Once the ember bed establishes, foil packets go in the low zone first. Potato-based packets need more time, so starting them early keeps them from overlapping with the main. Open the grill with bacon or mushrooms in the medium zone as the starter.
- 25–40 min
Transition from starter to main while eating. Chicken thighs and sausage: sear close to the hot zone first to set the surface, then shift to medium. When fat drips and flame responds, slide to the low zone immediately — no need to fight it. The sooner that repositioning becomes automatic, the fewer overcooking incidents there are.
- 40–60 min
Open the foil packets and finish. Potatoes get butter added here; onions and mushrooms take a few drops of soy sauce for an instant aroma lift. Timing the foil opening to match pulling the main from the grill means everything arrives together — even with a compact menu, the table feels complete.
ℹ️ Note
Solo cooking: keep the main dish to "ready to eat immediately after cooking." Chicken thighs, sausage, mushrooms, and firm tofu read easily and match the 60-minute format naturally. Thick block-cut meat adds complexity that works against the timing.
What to Prep in Advance and How to Divide Roles
The setup that makes campfire cooking feel easy is arriving with some work already done. Pre-cutting appetizer vegetables, marinating the meat, half-assembling the foil packets, making bread dough the night before — all of this converts fire-building time into cooking time rather than prep time. For Dutch oven bread specifically, an overnight first rise means you're shaping and baking at camp rather than waiting through fermentation.
The prep that has the highest leverage is sides, not mains. Mains are actively managed anyway; sides are where time pressure creeps up unexpectedly. Pre-built foil packets for potatoes and onions, a mushroom mix ready to go, pre-skewered vegetables — a small amount of advance work makes running multiple items simultaneously dramatically less stressful.
For role division, keep it simple. Three roles is enough for any group size: fire management, ingredient staging, plating. The fire manager watches the heat zones and handles positioning. The ingredient handler sequences what goes on next. The plater receives finished items and carries the table from starter to main. With this division, you don't end up with everyone crowding around the fire grill with tongs — the work flows, and nobody gets in each other's way.
Solo cooking means handling all three roles, which is manageable as long as you don't try to finish three dishes simultaneously. Stage foil packets first, run a light starter, then focus the main — that sequence works cleanly within 60 minutes. Adding a Dutch oven to solo cooking multiplies the active management significantly, which is why the rule of thumb holds: 60-minute light format solo, 90-minute full format for groups. Sticking to that makes campfire cooking genuinely relaxing rather than an endurance test.
Safety, Etiquette, and Cleanup — What Not to Skip
Confirming Direct Flame Policies and Working Within Them
Campfire cooking is enjoyable right up until you get something wrong here — and then the atmosphere of the whole site changes. Before you think about recipes, know whether the campsite permits open-ground fires, whether a fire grill is mandatory, and how ash disposal works — whether carry-out or designated on-site collection. Jalan News frames this clearly: fire use begins with understanding the facility's rules, not your preferred setup. Building your fire configuration around these constraints rather than around cooking convenience produces a smoother experience from arrival through departure.
In Japan, ground-level open fires are prohibited at the vast majority of campsites, so planning around a fire grill as the baseline is the default assumption. A fire grill keeps embers off the ground, protecting soil and turf while keeping your cooking surface stable — a practical benefit for cooking, not just a compliance requirement. The standard setup: a fire grill mat beneath the fire grill, with a cooking grate or grates resting on top. This preserves the live-fire feel while protecting the ground and stabilizing the fire bed. The fire grill mat is unglamorous but the satisfaction of not leaving scorch marks on someone's campsite is real.
On-hand safety gear: fire grill mat, heat-resistant gloves, water bucket, and ash pot. Cooking means regularly adjusting grate position, moving wood, and touching high-temperature surfaces — gloves are not optional. A water bucket and ash pot together create a clean shutdown sequence at the end of the session: temperature drops fast, and ash can be transferred safely. It looks like a lot of gear, but campfire cooking safety works in order: first the equipment to end safely, then the equipment to cook well.
Correct Extinguishing and Ash Disposal
The session isn't complete when dinner is done. Before sleeping or packing out, what you need is not visually extinguished but thermally cooled through. Ember beds that show no red surface glow can still hold significant internal heat — finishing on appearances alone is genuinely risky.
The correct sequence is straightforward. Use tongs or fire tools to break up remaining logs and coals and stir the full ash bed, bringing heat from inside up to the surface where it can dissipate. Stop adding air — no fanning, no bellows. Then apply water if needed to bring the temperature down. The standard for "done": you can hold your hand near the ash without feeling any discomfort. Getting to that point eliminates the unpleasant moment at teardown when the fire grill is still radiating heat from an apparently dead ash bed.
Ash disposal follows campsite rules: carry-out sites require transfer to an ash pot or heat-safe container; sites with designated disposal areas accept ash after full extinguishing. Half-burned wood or warm ash treated as waste creates genuine fire risk rather than completing cleanup. The hinata resource on campfire practice frames it this way: the session ends when the ash is cool, not when the eating is done.
💡 Tip
If cleanup is going to be delayed, stop adding large logs after the meal and let the ember bed taper naturally. Using residual heat only for boiling water for tea keeps the fire manageable and means extinguishing is calm rather than rushed when bedtime comes.
Wind and Weather Judgment, and Kids' Movement Paths
In campfire cooking, reading the wind matters more than reading the recipe. Flame drifting sideways, sparks traveling across the site, fat on the grill suddenly catching and going sideways — any of these is a signal to prioritize safety over the remaining dishes. I've called a cooking session early and finished on a gas burner when a forecast of 7m/s wind materialized at the fire. The question in that moment wasn't "can I get one more course out" — it was "is this the right call." Late in an evening, that judgment made quickly is always better than the alternative.
Rain or soft ground adds another layer: your footing is unstable, and the separation between cooking space and living space matters more than usual. The same thinking behind tent waterproofing and water pressure ratings — how to arrange your camp around weather conditions — applies to how you position the cooking area relative to shelter.
When children are present, the fire grill perimeter should never be a general thoroughfare. The most effective arrangement: cooking position faces the fire grill front; a storage area (plates, cooler box) is to one side; the other side is not a through-path. This means even when a child moves fast and unexpectedly, they're not crossing directly past the fire. Note that children are more likely to contact the fire grill legs and fallen coals than the flame itself — keeping the ground around the fire grill within your field of vision matters as much as the fire bed itself.
Cooking well and wrapping up safely aren't separate goals — they're the same session. When the fire grill, mat, water bucket, and ash disposal sequence are all in place, the satisfaction of the meal extends all the way through cleanup. A well-managed campfire feels different at the end: quieter, more complete.
Pre-Trip Checklist and Gear Review
Here's a consolidated checklist for everything from booking through pack-out — structured to prevent the on-site realization that something essential is missing.
Before Booking
Arriving at a campfire cooking session and starting to problem-solve is how setup fatigue happens before the fire is even lit. The three questions to answer at booking stage: is ground-level fire permitted, is a fire grill required, and what is the ash disposal policy? Getting all three sorted in advance sets your gear list and menu planning at the same time. Leaving any of them ambiguous leads to recipes that can't be used, or an ash situation that turns into a logistical problem at pack-out.
If ambiguity remains, internal references like the tent waterproofing guide and family camping layout resources cover site setup thinking that feeds into how you arrange your cooking area.
If you're planning to bring a Dutch oven, the cast iron vs. enamel question belongs here too. Cast iron pairs naturally with campfire cooking and handles braises and roasts well, but requires care throughout the process. Enamel versions are more convenient day-to-day, but campfire compatibility varies significantly by product — check before assuming. If a seasoning-required cast-iron model is part of the plan, completing that process before the night before departure is strongly recommended. With a Dutch oven, whether the prep work is done determines day-of comfort more than the pot itself does.
My own first campfire cooking session was an overreach — too many dishes, too little margin. What stabilized things was deciding at booking time: "fire grill focus this trip, Dutch oven next time." Once the scope was set at planning stage rather than on-site, the cooking felt much more in control. If you're also thinking about living space, the same gear selection logic that applies to tent choice — matching setup to actual conditions rather than aspirational ones — applies here.
At the Campsite
What separates good results from frustrating ones on-site is usually when you start cooking, not how. Campfire cooking is far more reproducible when you wait for active flame to settle into an ember bed before anything goes on the grill. Placing the grill over an established ember bed alone — rather than still-active flame — eliminates the most common first-session failures. Foil packets placed too early or late can both be corrected once you know where the stable heat zones are.
For your first session, keeping the menu small is the move that gives you the most margin. My most relaxed fire grill sessions have followed a "one grill item + one foil packet" structure. Running a beef steak on the fire grill while a mushroom packet sits to the side in the low zone means you're tracking two things at once — but each requires a different cue. The steak is about browning and aroma; the packet is about steam. They don't compete for attention in the same way. Starting there, and adding a Dutch oven in a subsequent session, avoids the situation where more gear than hands is the problem.
⚠️ Warning
For a first campfire cooking session: "one active item, one passive item" is the format where you come away with both satisfaction and confidence intact. You're cooking, you're managing, and nothing is getting ahead of you.
If the Dutch oven is in play that day, confirm that the supporting equipment is on hand before the pot goes over the heat. A Dutch oven without a bottom rack, lid lifter, or proper gloves stops being manageable quickly. For longer-cooking dishes, work backward from when you want to eat: roast beef at around 1 hour, dark beer braise at about 1.5 hours, sweet potatoes at around 30 minutes. Starting these in daylight rather than after dark is a meaningfully better experience — the campfire setup operates best when everything is staged and waiting when the fire is ready, not assembled reactively once cooking has begun.
Before Pack-Out
Ten minutes after the meal is where campfire cooking's final impression is made. Before packing down, make sure everyone present knows the extinguishing plan and where the ash is going — not just the person who cooked. If one person understands the ash situation and others don't, the cleanup can become dangerous quickly regardless of how carefully it was planned.
Rather than relying on memory, work through three items in order:
- Are there any large remaining logs or coals?
- Is there any residual heat or glow below the white ash surface?
- Does the ash disposal destination match the campsite's rules?
Checking twice on each of these catches the scenario where things look finished but aren't — the fire grill shifted, internal heat came back to the surface, and what appeared to be a cold ash bed was still warm. I learned this after a fast teardown where tilting the fire grill brought a surge of heat up from the interior. Since that trip, I break up the ash bed, look at what's underneath, and transfer only after confirming — the sequence doesn't move.
The taste of the meal is set by the cooking. The lasting feeling of a campfire cooking session is set by how cleanly it ends. Starting your first session with steak and a mushroom packet, executing the fire-build-to-ember sequence deliberately, and following through on ash disposal leaves you ready for the Dutch oven next time without any hesitation about whether you're doing this right.
Seasonal Menus and Two Ideas from 2025–2026 Food Trends
What to Cook Across Spring, Summer, Fall, and Winter
Matching seasonal ingredients to the right fire method is the most reliable way to elevate campfire cooking without adding complexity. Before planning a menu, I ask two questions: "Does this ingredient benefit from moisture escaping on the fire grill?" or "Does it work better with trapped steam in the Dutch oven?" When the answer is clear, the dish doesn't need much seasoning to feel like a genuinely good campfire meal.
Spring: new potatoes and spring cabbage are the seasonal anchors — high moisture, naturally sweet, and well-suited to foil steam cooking. Set them away from direct-fire zones, in the gentle ember-adjacent heat at the edge of the fire bed, and they develop flavor evenly. New potatoes go fluffy all the way through; spring cabbage releases sweetness under steam. Olive oil, salt, and a small knob of butter is the full recipe. Spring evenings still carry a chill, and the moment you open a foil packet and steam hits the cold air is something worth planning for.
Summer: shell-on grilled seafood and thin-crust pizza are the standout combination. Seafood — scallops, prawns, squid — brightens a whole table when the surface is quickly set on the fire grill and the aroma comes up. For pizza, I use a two-stage process: grill the base directly on the fire grill first to get a crisp underside, then top it and finish in the Dutch oven under lid heat. The contrast between the crunchy base and the moist, airy interior is noticeably better than single-method baking. It photographs well, and at a summer campfire it produces exactly the sense of "we actually cooked something" that makes the effort worthwhile.
Autumn: mushroom grill and duck breast together is the seasonal combination that comes together most naturally. Mushrooms — shiitake, maitake, king oyster — mixed on the fire grill produce aroma and textural variation from a single cooking motion. Duck breast goes skin-side down first; 5 to 8 minutes on the fat side, 3 to 4 minutes on the flesh side is the rough guide. When the campfire smoke enters the rendering fat, the result tastes unmistakably of autumn. A trick worth trying: grill the mushrooms first and let them rest near the area where duck fat will fall. They absorb just enough rendered fat to build depth without needing a sauce.
Winter: the Dutch oven is the only reasonable choice. Root vegetable braise, legume stew, beef in red wine or dark beer — sealed encircling heat from above and below is exactly what cold air calls for. The configuration for winter Dutch oven cooking: keep top heat somewhat heavier than bottom, rough distribution 40% bottom / 60% top. This prevents base scorching and keeps the whole vessel cooking at an even pace. A winter braise turns waiting time into anticipation — the weight of the pot is entirely worth it.
💡 Tip
When seasonal planning feels uncertain: spring and autumn = foil packets and fire grill; summer and winter = fire grill and Dutch oven. Matching cooking method to the moisture content of the ingredients and the temperature of the air is all the framework you need — the specific dish comes naturally from there.
Two Trend-Inspired Ideas for the Campfire
Food trends work better at camp when they're adapted to what fire cooking does well rather than imported unchanged. Looking at the patterns visible in the Cookpad Food Trends report and the 2026 food forecast, two ideas translate directly to campfire cooking: fusion herb broth cooking and ichiju-sansai bowl meals (a Japanese-inspired composed bowl format). Neither requires new equipment — both work by slightly redirecting the fire grill and Dutch oven you already have.
Fusion herb broth cooking adapts well to the Dutch oven. The concept: root vegetables (daikon, carrot, burdock) slow-cooked with a modest blend of cumin, black pepper, ginger, and star anise, kept restrained in seasoning. The result doesn't sit clearly in Japanese simmered food territory or curry territory — it's somewhere between, warming in a way that feels intentional. Campfire smoke mixes with the spice aromatics without amplifying them aggressively, adding a background layer that makes the dish feel more complex than the ingredient list suggests. The key is keeping salt moderate and letting the vegetable sweetness carry the flavor — outdoor cooking doesn't benefit from heavy seasoning.
The ichiju-sansai bowl takes the campfire meal beyond "here's the meat we grilled." Fire-grilled chicken thigh, bell pepper, and mushrooms arranged over a grain base with a small broth on the side — presented in a single bowl — makes the table look complete in a way that scattered plates don't. The combination of grill char and hot broth arriving together delivers a satisfaction that a plate of protein alone rarely achieves. It's a meal, not just a collection of cooked items.
What both ideas share is an interest in texture contrast — the current direction in food is away from single-texture experiences toward compositions where one bite offers something different from the next. At a campfire, this is accessible without extra technique: grill to develop crust, then steam or braise to reintroduce moisture. The summer pizza is the clearest example — crisp base from direct grill contact, moist interior from Dutch oven lid heat. Root vegetables can follow the same logic: sear the surface first to set the edges, then braise until the interior goes soft while the outside stays defined. Campfire cooking is inherently bold, but this kind of intentional contrast is what makes it genuinely memorable rather than just impressive-looking.

クックパッド「食トレンド大賞2025・食トレンド予測2026」を発表
クックパッド株式会社のプレスリリース(2025年11月26日 11時00分)クックパッド「食トレンド大賞2025・食トレンド予測2026」を発表
prtimes.jpWhere to Start: Embers + Fire Grill. Then Try the Dutch Oven's Hands-Off Magic.
When campfire cooking feels uncertain, start with a fire grill over an established ember bed. It's the safest approach, the most reproducible, and the one most likely to produce a moment where you think: "I actually cooked that well." Build the repertoire from there — Dutch oven when you're ready to slow-cook something impressive, Direct flame cooking when the experience itself is what you're after. That order makes sense.
Start the first session with one fire grill item and one foil packet. A beef steak on the grill while a mushroom packet warms in the low zone is genuinely enough. Get comfortable with the two-item flow, then add a Dutch oven to the next session — you'll find the "just set it and let the pot work" feeling clicks immediately once you have the ember management dialed in. For me, the real shift came when I stopped chasing flame and started cooking on embers. The failures dropped off. The campfire became something I felt confident around. That shift — from watching the fire to working with it — is the actual payoff of campfire cooking, beyond any specific dish.
A camp cooking researcher and food coordinator. Drawing on 10 years in the food industry, she reviews campfire cooking and cookware from the perspectives of both taste and convenience.
Related Articles
6 Best Camping Fire Pit Mats Compared by Continuous Use Temperature
When choosing a fire pit mat in Japan, you'll have better results by prioritizing continuous use temperature rather than just picking something that 'looks heat-resistant.' If you want to properly protect grass sites or wooden decks, aim for 700°C or above. With low-profile fire pits, layer a high-heat-resistant mat with reflective insulation, or ensure adequate clearance from the ground.
Solo Campfire Stoves Under 500g: 8 Top Picks Compared
Once you start solo camping on foot, by bike, or motorcycle in Japan, you quickly learn that lighter isn't always better for a campfire stove. That said, there's genuine appeal in the lightness gained by fitting a thin stove into your backpack's back panel on days when you're hiking from the station to camp. But real usability varies significantly based on storage shape, how easily wood fits, and wind resistance.
How to Choose a Fire Grill | Compared by Camping Style
Rather than picking a popular model on instinct, choosing a fire grill gets a lot easier when you nail down five things first — group size, how you travel, what you want to do, firewood length, and setup effort. This guide breaks down five types — scenic, cooking-focused, ultralight, secondary combustion, and family — comparing weight, packability, load capacity, price range, and setup method side by side.
How to Choose a Fire Grill for Cooking in Japan | 5 Key Criteria
Want both the joy of watching a fire and the confidence that your food will cook properly? This guide breaks down fire grills by three conditions—group size, cooking style, and transportation method—so you can choose with confidence. We'll cover when you need a 40cm+ size, why 15kg+ load capacity matters, and specific models ranging from lightweight 794g options to the practical sweet spot of 2.8kg with 3cm storage depth.