Mestin Rice Cooking: 5 Essential Tips and Easy Variations
Mestin Rice Cooking: 5 Essential Tips and Easy Variations
Mestin rice cooking in Japan might seem difficult at first, but mastering just five fundamentals—water volume (rice portions), soaking time, heat control, steaming, and pot size selection—yields remarkably consistent and delicious results. Beginners often struggle with unclear guidelines on how much rice their mestin can handle and how much water to add, making this a cooking method where clear standards make all the difference.
Mestin rice cooking in Japan might seem difficult at first, but mastering just five fundamentals—water volume (rice portions), soaking time, heat control, steaming, and pot size selection—yields remarkably consistent and delicious results. Beginners often struggle with unclear guidelines on how much rice their mestin can handle and how much water to add, making this a cooking method where clear standards make all the difference.
On a cool mountain morning in autumn with temperatures around 50°F (12°C), when I'm cooking a cup of rice with solid fuel, the intensity of steam escaping from the pot's edge and the subtle crackling sound tell me exactly when to adjust the heat and when to begin steaming. This article walks through the fundamentals in a way that's easy to replicate, covering the five essential tips for avoiding failure, size-specific guidelines, step-by-step instructions for a single cup of white rice, and five simple variations you can prepare right away.
By the time you finish reading, you'll be able to judge the right rice-to-water ratio for your mestin—whether it's a standard Trangia TR-210 or a marked Daiso model. You'll see how to achieve consistent, reproducible rice cooking that works whether you're using solid fuel or a camping stove, and how to pull it off reliably outdoors.
Mestin Rice Cooking Isn't Difficult | Foundational Basics to Master First
The mestin is traditionally known as an aluminum box-shaped cooker. It's a type of military mess tin, but its wider base compared to round cookers makes it easier to handle because heat distributes evenly. Since aluminum has high thermal conductivity, one part of the pot doesn't heat up dramatically faster than others, making it perfect for cooking like rice where you want uniform, gentle heating throughout. Though it looks specialized for rice cooking, it actually excels at boiling, frying, and steaming, so having one expands your cooking repertoire considerably.
The reason it seems difficult isn't because the steps are complex. Most failures come down to one of four things: too much water, too little water, insufficient soaking time, or heat that's too high. On your first attempt, it's tempting to think that "rapid cooking over high heat will turn out better," but this often backfires. Through my own outdoor testing, strong flames make the pot boil over easily, water escapes, and you end up with a scorched bottom and uncooked centers. Conversely, keeping a steady, gentler flame makes the steam rise more gently and success rates feel noticeably higher.
The Trangia TR-210, Trangia's signature model, measures approximately 6.8×3.7×2.4 inches (17×9.5×6.2cm), weighs about 5.3 ounces (150g), and holds roughly 25 fluid ounces (750ml), with a recommended cooking capacity of about 1.8 cups. For solo camping, it's a pleasantly manageable size—even with a cup of rice and water inside, it never feels awkward to handle. If you're thinking of cooking for multiple people or making rice dishes with mix-ins, larger models like the TR-209 become a practical option. That one measures about 8.1×5.3×2.8 inches (20.7×13.5×7cm), weighs about 9.5 ounces (270g), holds roughly 45 fluid ounces (1,350ml), and can handle up to about 3.5 cups. Since capacity directly determines how much you can realistically cook without stress, watching capacity first is the quickest path to choosing the right size.
For pricing, a reference Amazon listing for the standard TR-210 shows approximately ¥1,350 (USD $9–10 / £7–8, note: prices fluctuate by retailer and timing). For an even gentler entry point, Daiso offers mestin options in multiple sizes—1 cup, 1.5 cups, and 3 cups—all available at store counters. Typical store prices run about ¥550 ($3.70 / £3) for the 1-cup model, ¥880 ($6 / £4.80) for the 1.5-cup, and ¥1,100 ($7.50 / £6) for the 3-cup, and models with internal measurement markings make water-volume management considerably simpler. Since struggling with rice cooking often stems from measurement rather than technique, marked models offer real practical value for beginners.
On the prep side, while plain aluminum mestins get attention for burr removal and seasoning, anodized-coated models skip that step more easily. Even the 1.5-cup Daiso model carries anodized coating labels, making it friendly for hassle-free early use. These finishing differences matter less for cooking method itself and more for lowering initial barriers and keeping maintenance stress-free.
From here, I'll work through the five core elements—water volume, soaking time, heat control, steaming, and pot size—in order. Then I'll cover size-specific guidelines, a reliable step-by-step process for consistently cooking a single cup, and easy variations that even beginners can tackle. Whether you're reading camping recipe sites or manufacturer guides, nailing these fundamentals turns out to be what matters most. Mestin rice cooking might appear to have many tricks, but really it's a method where the key points stand out clearly.
Five Essential Tips for Mestin Rice Cooking
Water Volume: 1 Cup Rice = ~200ml / 1.5 Cups = ~290ml / 2 Cups = ~400ml / 3 Cups = ~600ml
The most reproducible standard for mestin rice cooking is fixing your water volume to a specific measurement rather than guesswork. With white rice, starting with about 200ml for one cup dramatically cuts down failure. Remembering that 1.5 cups takes ~290ml, 2 cups takes ~400ml, and 3 cups takes ~600ml makes it much easier to adjust across different-sized mestins.
People sometimes describe water ratios using "1.2 times the rice amount," but outdoors this math gets surprisingly fuzzy. I usually either use a measuring cup or rely on a Daiso mestin with internal markings, but plugging the actual numbers in keeps things stable even during groggy mornings. Especially with a single cup, a difference of just a few teaspoons affects the final texture noticeably, so early on, precise measurement beats eyeballing.
A standard Trangia TR-210 holds about 25 fluid ounces (750ml) at full capacity with a recommended cooking range of roughly 1.8 cups, so cooking around 1 cup comfortably fits its comfort zone. For 2 cups, larger sizes work better with less stress. When aiming for 3 cups, a larger model like the Trangia TR-209 makes it easier to minimize boil-overs and mixing difficulty.
Soaking Time: 30 Minutes
Letting rice sit for roughly 30 minutes after rinsing transforms how consistent your cooking becomes. Since aluminum heats so quickly, skipping the soak leaves you with softened outsides and hard centers. Pre-soaking ensures the heat penetrates evenly and evenly right to the core even with a shorter cooking window.
When I cook breakfast rice at camp, I soak the rice first, then fire up water for tea or prep other dishes. This waiting time does double duty as prep work, and nothing feels forced about it. After a 30-minute soak, the later half of cooking stays more settled without frantic heat adjusting, and the rice naturally fluffs better.
Mornings, especially cold ones, really drive home the value of soaking—skipping it makes a noticeable difference in overall happiness.
Heat Control: Start Medium Heat → Boil Cue Switches to Low Heat. If Boiling Over, Lower Further
Heat management hinges not on intensity itself but on when you make the switch. Medium heat works fine at the start, but the moment steam rises vigorously from the lid gap and the inside reaches a rolling boil, drop to low heat. Keeping it at medium causes water to churn violently and spill over the sides. If foam or liquid surge outward, lower the heat even more.
Two easy signals help: steam pattern and pot-bottom sound. Early on, you hear a wet "shhhh" sound, but as water reduces, it becomes drier with a light crackling coming from the pot's bottom—a sure sign it's time to ease off. This "steam settling down and the sound shifting" cue works equally well with solid fuel or a camping stove, and once I caught onto it, I practically stopped peeking under the lid.
Lids that sit loosely sometimes clatter from steam pressure during heating. In those cases, a weight helps stabilize things. Rather than a random rock, something heatproof, clean, and dedicated—like a small plate or purpose-built weight—lightly placed on top tames the bouncing and keeps spills minimal. A weight isn't required, but it works wonders if you're battling boil-overs or lid shift.
With solid fuel, one cup typically burns for around 20–25 minutes (though actual burn time varies significantly with air temperature, wind, and windbreak setup, so plan generously on-site). A single 25-gram solid fuel tablet makes "set and forget" cooking quite doable; however, Esbit's 14-gram tablets burn for only around 12 minutes—one alone falls short. Using 14-gram tablets means running two packs to ensure sufficient heating for rice cooking.
💡 Tip
If the pot boils over even after lowering heat, that's a sign the flame is still too strong. A gentler steaming—where steam slips out thinly from the lid gap rather than rushing out forcefully—keeps white rice much more cohesive.
Steaming: 10–15 Minutes After Turning Off Heat. Flip the Pot and Wrap in a Towel for Even Results
The 10–15 minute steaming period after cutting heat is crucial for pulling the final result together. Right after the flame dies, moisture levels in the upper and lower layers haven't stabilized yet. This waiting window lets internal steam and moisture redistribute evenly throughout, taming the uneven texture that shows as mushy tops and firm bottoms.
With mestins, the classic move after heat is off is flipping the pot and wrapping it in a towel. Changing direction helps internal steam and liquid spread more uniformly instead of settling in one spot, evening out the mushiness-versus-firmness gap. On straightforward white rice, I really feel this difference—the first bite after patience wins out tastes completely different.
Keep the lid closed during steaming and trust the residual heat. Thinking of the heating and steaming together as one complete step makes the whole process clearer.
Pot Size and Fill Level: Aim for 70–80% Capacity for Breathing Room
Success in mestin rice cooking comes from thinking about what you can cook comfortably, not what technically fits. Filling near the brim leaves almost no room for boiling action, making spills far more likely. Aim for cooking at roughly 70–80% capacity for true ease.
For example, the Trangia TR-210 maxes out at roughly 750ml with a recommended range up to 1.8 cups, so daily cooking around 1 cup feels best. Up to 1.5 cups works, but rice dishes loaded with add-ins or higher-heat environments eat into headroom quickly. The Trangia TR-209, with its 1,350ml capacity and 3.5-cup range, lets you comfortably target 2–3 cups with genuine calm. The comfortable "overflow buffer" changes cooking enjoyment.
When sizing feels unclear, solo-focused cooking suits the TR-210 or Daiso 1–1.5 cup range; cooking for two or meal prep favors the TR-209 or 3-cup range. This framing keeps you from second-guessing. Rice cooking prefers a size with a little breathing room to tight-fit sizing—it's simply harder to fail, and mixing becomes genuinely more pleasant.
Size-Specific Water Volumes and Recommended Cooking Amounts
Trangia TR-210
If you want a measuring-stick for your own mestin, start with the Trangia TR-210. It measures 6.8×3.7×2.4 inches (17×9.5×6.2cm), weighs 5.3 ounces (150g), and holds roughly 25 fluid ounces (750ml). According to Iwatani-Primus product pages, the recommended range goes up to roughly 1.8 cups. It's regularly cited as the "regular size" because these proportions work out so cleanly.
In real-world use, the TR-210 aligns "what fits" with "what's comfortable to handle" beautifully. For a solo meal, around one cup feels particularly effortless—rinsing the rice, adding water, heating, and steaming all happen without a crowded feel. Personally, I find this size friendly for breakfast and lunch alike, and a wooden rice paddle or spoon fits without bumping sides. The "just-right" comfort shows.
At face value, a 750ml capacity might sound small, but for white rice it's actually a strength. With one cup total, the package stays light and doesn't hog much space in your pack. It beats smaller models with their tighter quarters but avoids the bulk of larger sizes, so "regular" really does fit. (Reference) Amazon listing example: ¥1,350 (price subject to change)
Trangia » A kitchen for all
A kitchen for all
www.iwatani-primus.co.jpTrangia TR-209
On days when you want substantial portions or cooking for two becomes routine, the Trangia TR-209 becomes instantly practical. It measures 8.1×5.3×2.8 inches (20.7×13.5×7cm), weighs 9.5 ounces (270g), and holds roughly 45 fluid ounces (1,350ml) with a recommended range of roughly 3.5 cups. Next to the TR-210, it visibly steps up in size—think of it as the "large" to the regular's standard.
Its value lies beyond simply cooking more. When rice quantity climbs, you need convection room and mixing space, both of which this size supplies generously. Whether cooking 2+ cups or loading in mix-ins for rice dishes, it handles everything with plenty of slack. I notice on "heavy ingredient" days that the larger size's comfort is night-and-day different—the regular starts feeling "it fits, but barely." The TR-209 breathes room throughout.
Portability does take a step back. At roughly 9.5 ounces, it's not dramatically heavy, but it occupies noticeably more pack space. For solo-focused trips, go regular; for multiple people or rice dishes with mix-ins, go large. This swap logic maps easily onto your gear. Note: TR-209 is available in circulation, but stable pricing information wasn't consolidated at this writing, so this section stays to specs-only comparison for clarity.
Daiso: 1-Cup / 1.5-Cup / 3-Cup (Price Guide: ¥550 / ¥880 / ¥1,100)
A potent entry point for "I want to try mestin rice cooking" is Daiso's 1-cup, 1.5-cup, and 3-cup range. Based on prices noted on CAMP HACK and similar sources, expect around ¥550 ($3.70 / £3) for 1-cup, ¥880 ($6 / £4.80) for 1.5-cup, and ¥1,100 ($7.50 / £6) for 3-cup, though pricing shifts by season and store. Being able to try different sizes at such low barriers is huge.
Capacity logic stays straightforward: 1-cup is your small, 1.5-cup skews toward regular, and 3-cup is your large. This mapping lets you swap easily. For solo white rice, pick 1 or 1.5 cup; for two people or meal prep, go 3-cup, and you stay clear-headed. Daiso's 1.5-cup model officially lists 3.7×6.3×2.4 inches (9.5×16×6cm), providing enough specs to compare against regular-size thinking easily.
What really stands out with Daiso is models with internal measurement markings. You see these especially on 1.5-cup and 3-cup sizes—they let you watch the water line as you pour, making rice cooking reproducible without a measuring cup. Early on, "eyeballing" water tends to drift, but having markings visible cuts the guesswork down a notch. During murky mornings or dim evenings, seeing the number right there makes a surprising difference in peace of mind.
For a measurement baseline, reach for Trangia; for pure ease and clarity, Daiso makes sense. The 1.5-cup model, specifically, tends to click perfectly for solo cooks wanting a touch more headroom.
💡 Tip
Marked mestins let you nail water volume without memorizing exact amounts every time. Beyond plain white rice, they also help you adjust on the fly—"today I added veggies, so I'll ease back on water"—making them handy for daily use, not just beginners.
Size-at-a-Glance: "Comfortable Cooking Amount" Reference Table
If you're mapping this to gear you own, watch actual comfortable cooking amounts, not maximum capacity. When you're building in mix-ins, dropping one tier lower keeps things genuinely pleasant.
| Size Class | Example Model | Capacity | Maker's Recommended Range | Comfortable Cooking Range |
|---|---|---|---|---|
| Small | Daiso 1-Cup | 1-cup labeled | 1 cup max | 1 cup |
| Regular | Trangia TR-210 | ~750ml | ~1.8 cups | 1 cup typical, up to 1.5 cups with margin |
| Regular-leaning | Daiso 1.5-Cup | 1.5-cup labeled | 1.5 cups max | 1 cup typical, up to 1.5 cups with margin |
| Large | Trangia TR-209 | ~1,350ml | ~3.5 cups | 2 cups typical, 3 cups easily doable |
| Large | Daiso 3-Cup | 3-cup labeled | 3 cups max | 2–3 cups |
Reading this table: small means "one person, precisely"; regular is the "solo sweet spot that's genuinely versatile"; large lets you "add more and still stay calm." My experience bears this out—one cup in a regular-size pot is the most relaxed, and once mix-ins enter the picture, large sizes pay dividends. That bit of extra capacity changes not just success rate but actual cooking pleasure.
For Beginners | Step-by-Step: Basic White Rice, One Cup
Prep
Reliably cooking one cup of white rice follows a strict path: rinse → soak → heat → steam—don't skip steps. Start by gently rinsing the grains, swapping cloudy water two to three times. Rub lightly by moving your fingertips loosely; hard scrubbing cracks the kernels.
Once rinsed, return the rice to the mestin, add water, and let it sit for 30 minutes. Skipping this leaves hard centers under soft outsides. During camp setup or coffee prep, I let soaking happen in the background—that time does the job without feeling added. The grain rise afterward is noticeably more even.
The lid tends to lift during heating, so place a small weight if needed to keep it settled. Marked mestins simplify water matching; Daiso's 1.5-cup model with internal guidelines is beginner-friendly.
Heating
Once soaking is done, apply heat. With a burner, start on medium, warming the entire base evenly. Jumping straight to high heat stresses the thin aluminum—the bottom chars before the center cooks, inviting failure.
Your boil cue comes from sight and sound. When steam rises vigorously from the lid's edges and the pot starts ticking, that's your sign it's reached a rolling boil. Lower the heat then to prevent overflow and ensure even interior cooking. This exact moment feels like the most critical to me—holding back and switching to low makes the difference.
Recipe sites like "Delish Kitchen" and CAMP HACK reinforce that dropping heat after a boil is foundational. A burner's advantage is that you can dial this shift smoothly by eye.
Mestin Rice Cooking: How-to & Recipe Video
Delish Kitchen
delishkitchen.tvSteaming
Once heat is off, leave the lid sealed for 10–15 minutes. Rushing this step leaves the top fluffy but the bottom firm and uneven. This window lets carried-over heat spread moisture evenly.
The insider's move: flip the mestin and wrap it in a cloth. Inverting lets pooled water and heat redistribute, smoothing out texture gaps. Sites like "Happy Camper" discuss this technique, and trying it really shows—less soggy bottoms, more even grains.
Mestin Rice Cooking Explained for Beginners! Easy Recipe Ideas Too - Happy Camper
Mestin is a piece of gear many campers have heard of at some point. It works for many dishes, but about
happycamper.jpFinishing
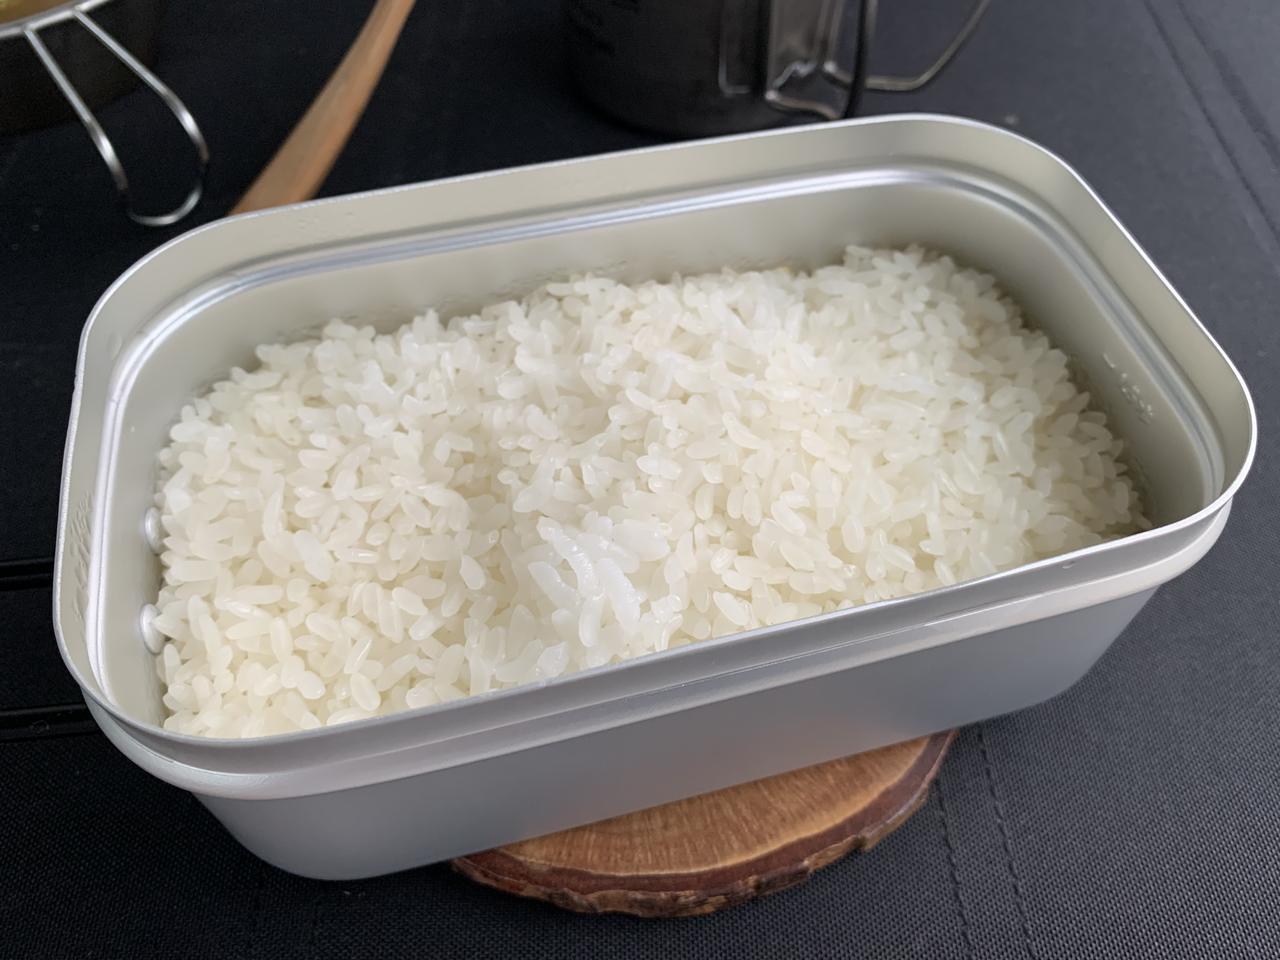
Once steaming ends, open the lid and fluff with a wooden paddle or spoon, scooping from the bottom. Slicing motions squeeze out extra water and crush grains; lifting keeps them intact. This is where the aroma jumps, and plain rice suddenly tastes incredibly satisfying.
If the bottom shows a thin golden tint, that's harmless—actually aromatic. Enjoy it as a treat instead of mixing it in. A deeply hardened, burnt bottom signals next time to switch to low heat a hair earlier.
💡 Tip
If the surface looks glossy after steaming, you're in great shape. If it looks watery, hold off on fluffing, close the lid, and let it settle a moment longer.
Solid Fuel vs. Camping Burner
Both work for one-cup cooking, but the approach differs. Solid fuel excels at "set and forget," which is genuinely easy for one cup. A 20–25 minute burn span lets you cook on autopilot; many mornings I lean on this hands-off ease. The rice often comes out cleanly on the first try.
However, outdoor conditions matter. Cold dawn air or windy sites don't give enough heat, sometimes leaving you just short of done—I've actually felt like mid-cooking I needed "a little more fuel" on winter trips. Cold weather calls for planning conservatively.
A camping burner's superpower is letting you drop heat the moment you see the boil, reading steam patterns and pot sounds to dial in comfort. Early on, you'll hover closer, but this precision beats set-it-yourself. Both share the same rhythm—watch for boil, drop heat, flip and wrap for steaming, fluff and finish. Get this sequence right, and one-cup rice becomes wonderfully stable.
Mestin Easy Variations: Five Simple Mix-Ins
Once solo white rice feels stable, the next urge is to toss in ingredients and let them cook. Mestins shine with this "load and go" simplicity. After setting up camp, while the rice cooks untouched, I prep soup or drinks—the few ingredients create surprising table satisfaction. Here I've picked five minimal-ingredient dishes that flow naturally from rice cooking, focusing on low failure rates and realistic prep.
Canned-ingredient rice dishes almost never fail, and breakfast ramen or soup dumplings in one pot practically run themselves.
Canned Yakitori & Burdock Root Rice Dish
Canned yakitori (grilled chicken) paired with burdock root is an outrageously good first variation. The can's flavor infuses the rice instantly, so you barely adjust seasoning—it flavors itself. Using store-bought shredded or sliced burdock skips knife work entirely.
The method is dead simple: soak rice, scatter yakitori and burdock on top, and cook. Pour the can's liquid in to let poultry umami spread throughout; the moment you crack the lid, the aroma jumps. Yamada Marché and similar sources often highlight canned mix-ins as minimal-effort classics, showing how well they pair with mestins. The result tastes restaurant-level even though you did almost nothing.
The sweet-salty yakitori flavor plus burdock's earthy depth transform canned simplicity into genuine home cooking. Honestly, the first time I made this—seeing effort this low create food this satisfying—I suddenly understood why mestins excite so many people.
Canned Tuna & Mushroom Butter-Soy Rice Dish
Canned tuna with mushrooms is another beginner-proof winner. Tuna stays shelf-stable; mushrooms (shimeji or maitake) tear apart by hand, needing zero knife skills. Butter and soy are your only seasonings.
Method: Spread tuna and mushrooms over soaked rice and cook through. After steaming, finish with a pat of butter and a soy drizzle—the fragrant steam rising at that moment is genuinely enticing. The tuna's oil and umami soak into the rice, and because mestins are compact, butter-soy aroma concentrates beautifully, really pulling appetite forward. Tuna feels lighter than meat-can versions but fills equally well.
Morning or noon, this pairs well. Mushroom moisture keeps everything tender, and even kitchen-inexperienced folks land this easily—a genuine confidence builder.
Canned Mackerel-Miso with Ginger Rice Dish
Another canned heavyweight: mackerel-miso with fresh ginger. These cans arrive pre-seasoned, so the rice inherits ready-made flavor. A pinch of ginger sharpens the finish without heaviness.
Technique: Add the miso-mackerel can liquid and all to soaked rice, scatter julienned ginger on top, and cook. When done, fluff gently to distribute. Fish umami blooms through the whole pot—and main + starch finish simultaneously, slashing cleanup. Fish cans get overlooked, but mestins actually make them shine; the contained heat really draws out the flavors.
Taste runs strong, but ginger cuts richness, so it lands well even morning-empty. This demonstrates that one-pot completion—seasoning, main, starch all ready—is the real mestin advantage.
💡 Tip
With canned mix-ins, lay them on top rather than stirring them in during cooking—this keeps the grains from crushing. After steaming, fold gently to combine, preserving texture and looks.
Instant Ramen Twist
Morning ease reaches peak when you cook instant ramen directly in the mestin. No separate pot needed—boil water, snap the noodles in, simmer, add seasoning packet. One container, one meal, minimal fuss. After camp setup, especially in chilly dawn hours, this speed is genuinely comforting.
Tear the pack slightly to fit it easier. Toss in an egg, leftover vegetables, or bacon—the add-ons elevate it instantly. That "one-pot complete" magic—food ready, nearly no washing—lighten your mood before breakfast even lands.
Easier than rice variations, even more freeing than most breakfasts. If rice cooking ever feels overwhelming, instant ramen is your confidence reset: minimal technique, maximum "this actually works" feeling.
Soup Dumplings in Broth
Finally, soup dumplings (or any frozen dumplings) simmered in broth takes the "load and mostly wait" concept further. Frozen dumplings + hot water + broth base = complete breakfast or light lunch. The mestin's depth suits simmering perfectly, and success feels obvious as dumplings bob and cook before your eyes.
Boil water, make broth from powder, slide dumplings in, watch them cook and float. Add shredded spring onion or snap peas for bulk. Fire control barely matters here; it's almost impossible to botch, making it great for confidence-building on your mestin learning curve.
While rice dishes stand alone, one-bowl dumpling soups let you pair with rice cooked earlier, building whole meals from minimal effort. After running rice through, pivoting to hot soup takes minutes and creates a full spread from one cooker.
Common Mistakes & Recovery
Scorching: Strong Heat / Insufficient Water / Extended Exposure → Maintain Low Heat / Recheck Water / Use Heat Diffuser
Bottom char on mestins traces almost always to heat that's too aggressive or water that ran short. Thin aluminum heats fast; strong flames toast the bottom before the center cooks through. Trangia's own materials note the thin aluminum and advise against overzealous heat—this isn't opinion but material fact.
Fix it: Once boiling, keep heat truly low. Electric burners should hover around "settling simmer," and solid fuel shouldn't ignite with excessive vigor. If char appears but no hard center exists, the culprit was likely water shortage, not just heat. Tastehard-bottomed, fluffy-topped result? Water ran low; next time, be generous.
I sometimes set the mestin on wood or cloth after heating stops to ease residual heat, preventing the bottom from continuing to char during steaming. That transition from high heat to resting matters—metal stays hot for a bit.
Boil-Over: Too Much Heat / Maximum Fill → Reduce Heat / Upsize / Create Aluminum Foil Ring Guard
Spill-overs happen when heat overwhelms the confined space, or the pot runs at near-capacity. Rice alone overflows; loaded rice dishes definitely will if headroom is tight. Larger mestins holding near-max amounts behave predictably poorly.
First fix: Lower heat as soon as boiling starts. Gentle rolling prevents foam eruption. If it still climbs to the rim, the pot's undersized for that batch—choose larger next time. Two-cup cooking genuinely needs L-sized mestins; single-cup fits regular snugly.
Quick trick: fashion a thin aluminum foil ring around the rim to scatter foam and catch spray. Crude-looking but effective, keeping your table and sleeping bag dry. Boil-over is honest feedback—mestin size doesn't match load.
Hard Centers: Insufficient Soak / Premature Opening → Add 10 Extra Soak Minutes / Extend Steaming Uninterrupted / Add Minimal Water + Gentle Reheat
Rice with a hard core while the outside is tender usually signals incomplete soaking or opening the lid too soon. Calm the instinct to peek—those 10–15 steaming minutes can't be skipped.
Solution: Next attempt, soak an extra 10 minutes. If you already opened it partway through steaming, reseal and go longer. Already served but regret the texture? Add a tiny splash of water and barely-heat to finish cooking through without crushing the grains. Fluff gently; don't stir hard or you'll smash them.
Mushy Results: Too Much Water / Incomplete Steaming → Return to 200ml per Cup / Steam the Full 10–15 Minutes Undisturbed
Soggy rice typically means water overshot or steaming wrapped up early. The outside mushed while the inside stayed firm? Water was generous. Lifted the lid halfway through steaming? The structure collapsed early.
Rebalance: Go back to 200ml per cup if you eyeballed upward. If steaming gets interrupted, hold the full 10–15 minutes before opening. Patience in this window transforms mus
Choosing Your First Mess Tin
The Proven Pick: Trangia-Style Reliability
If "hardest to go wrong with" is your buying filter, the Trangia lineage is still tough to beat. It's essentially the reference standard when people explain what a mess tin is -- sizing, rice capacity, and accessory ecosystem are all well-documented, which means fewer dead ends when you're just starting out. The TR-210 in particular is the go-to regular-size model; in Japan it's distributed by Iwatani-Primus and easy to find. (Reference) Amazon listing example: around 1,350 JPY (~$9 USD; price fluctuates).
The reason a classic model feels safe isn't just name recognition. There's a deep pool of rice-cooking benchmarks and usage notes, making it easy to think of as the "baseline for comfortably cooking one cup of rice." When I recommend a mess tin to someone for the first time, I mentally anchor to the Trangia-size form factor. Having that single reference point instantly sharpens "too small" vs. "too large" judgments.
Another underrated benefit is the likelihood of getting a unit with clean edges out of the box. Raw-aluminum mess tins vary in rim finish between production runs, and starting with a smooth-feeling product cuts initial friction. More than rice-cooking success rate, it's the tactile loop of washing, wiping, and stowing that feels good. That difference compounds with every use.
Budget Entry: Daiso-Style (1-cup / 1.5-cup / 3-cup)
On the other hand, if the goal is "try cheap, see whether mess tins suit me," the Daiso lineup is remarkably capable. Per CAMP HACK's comparison, store-shelf pricing runs roughly 550 JPY (~$4 USD) for 1-cup, 880 JPY (~$6 USD) for 1.5-cup, and 1,100 JPY (~$7 USD) for 3-cup. With gaps that small, it's easy to pick a size that matches your appetite without overthinking the investment.
The upside isn't just price. Having 1-cup, 1.5-cup, and 3-cup options means you can match portion size right away. "Solo white-rice sessions" point to 1-cup or 1.5-cup. "Cooking with the kids at the park" or "bigger batches of seasoned rice" point to 3-cup. The lineup maps neatly onto real use cases.
What beginners appreciate most is the graduated markings on certain models. No measuring cup needed -- water leveling becomes genuinely easy. I often cook in fading evening light, and markings alone eliminate the "was that right?" pause. In a bright kitchen it's a minor thing; outdoors, that reduction in hesitation translates directly into comfort. It's one of those quietly happiness-boosting features.
Surface Finish Differences (Raw Aluminum / Anodized / Non-Stick) and General Care Tendencies
Beyond brand and price, surface treatment shapes everyday usability. Raw aluminum has an honest, rustic appeal. It develops character with use, and the seasoning ritual that often comes up is part of the fun -- if you enjoy tending to your gear, the compatibility is high. A little extra maintenance buys a lot of attachment.
Anodized finishes offer the best beginner balance. The surface is more stable, and compared to raw aluminum, odor transfer, discoloration, and sticking are all milder -- making it easy to use right out of the box. Even Daiso's 1.5-cup model carries an anodized spec, so you can keep cost low and convenience high. If "skip the prep, cook now, clean fast" is the priority, anodized delivers well.
Non-stick coatings push further toward easy release and easy cleanup. The advantage becomes huge once you branch into egg dishes or stir-fry-adjacent cooking. The trade-off is that the surface needs gentler treatment -- avoid scratches and dry-firing at high heat. If effortless post-meal cleanup is your top priority it's appealing, but the handling style leans a touch more careful than the other two.
ℹ️ Note
A quick framework: raw aluminum is for the joy of caring for your gear, anodized is for grab-and-go convenience, non-stick is for painless cleanup. It's less about which is superior and more about where in the cooking timeline you want the smoothest experience.
Sizing (Solo / Duo / Family) and the Value of Graduated Markings
Size selection has fewer misses when you think in terms of what you're cooking and how many batches rather than headcount alone. For solo or small-group plain rice, the regular size is the most manageable and keeps you feeling in control. Rice doesn't bounce around too much inside, and heat behavior is easy to read -- reassuring for a first mess tin. I'd anchor to this class and then scale up or down based on appetite or ingredient volume.
When you're cooking for two, making seasoned rice regularly, or serving family-style, a large size is more comfortable. Rice plus ingredients fill the interior faster than you'd expect, and the extra headroom makes the actual cooking easier. Even for solo use, if "ease of stirring" and "resistance to boilover" matter to you, going bigger is a valid call. Honestly, the slight bulk increase is worth the carry.
Solo campers who want more than plain rice -- think bacon-and-mushroom seasoned rice -- are better served by a size with a bit of breathing room. Conversely, if the plan is quick boiling for coffee, instant noodles, and light rice runs, the nimbleness of a 1-cup class shines. On day-trip-leaning outings where gear minimalism matters, that lightness feels great.
And for beginners especially, graduated markings pay outsized dividends. Reproducible water levels are the obvious gain, but outdoors the real value is that measuring effort drops to near-zero. Cold early mornings or dim evening light make precise measuring feel tedious. When the line is right there, the decision is instant and the cooking barrier drops a full notch. If reducing cooking stress is a goal, this feature is solidly practical.
Wrap-Up: Start with One Cup of White Rice and You Won't Go Wrong
For your next camping trip, cooking one cup of white rice over a solid-fuel tablet is more than enough to start. Keep the scope tight, nail the basic sequence once, and mess-tin rice quickly becomes a personal staple. After that, add one canned-ingredient seasoned rice dish, and you'll have the confidence that "plain rice is locked in, and improvising is easy too."
I sometimes run a two-meal day on a single mess tin -- instant noodles in the morning, canned seasoned rice at night -- and having just one versatile piece of cookware slashes dishwashing and noticeably improves site comfort. If you're looking to expand your cookware options or pick up easy recipes, pairing this with the tent sizing guide or the tent rain-proofing guide helps you assemble your next overnight trip more smoothly.
Related Articles
Titanium vs Aluminum Cookware: Weight, Heat Conductivity, and Price Compared
On a cold morning at around 3,000 feet, boiling just 300ml of water on an OD canister stove for a cup of noodles, the appeal of a lightweight titanium pot is immediately obvious. But when evening rolls around and you want to cook a cup of rice and fry sausages the next morning, aluminum's even heat distribution makes cooking noticeably easier.
CB vs OD Gas Canisters: How Temperature Should Drive Your Choice
Choosing between CB and OD gas canisters comes down to three practical questions: where are you camping, how cold will it get, and how are you getting there? For spring-through-fall car camping at lower elevations, CB canisters win on availability and cost at around 100-200 yen (~$0.70-$1.40 USD) each. When temperatures drop or you're hiking in with your gear, OD canisters paired with lightweight stoves deliver the cold-weather reliability you need.
How to Choose a Camping Skillet and Seasoning Steps
For backpacking, 8-inch cast iron varies significantly by model—lighter versions weigh around 1.1kg, while heavier models approach 1.7kg. When loaded into a pack, the heavier option often makes you think twice. A 6-inch skillet hits that sweet spot for a single serving of bacon and eggs at breakfast, with perfect portability in a campsite setup.
10 Easy Camp Recipes for Beginners — Gear and Food Safety
The secret to better camp cooking isn't more complex recipes — it's choosing meals that are hard to mess up and easy to clean up after. Here are 10 beginner-friendly recipes compared side by side across tools needed, cook time, dishes, serving size, and storability, so you can find the right fit for your trip.